Weaving a White Scarf With Ansteorran Star
Note: The information here is based on using 20/2 silk at at sett of 28. Changing the relative sett will require adjustments.
Design
In planning to weave the White Scarf with an Ansteorran star, I looked for a structure that had a good balance of strength vs flexibility. For this, I wanted a balance of plainweave and twill. I settled on the following two drafts. (click image to download WIF)
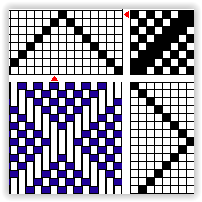
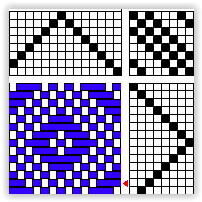
NOTE: While I have used both drafts, my preference is for the one on the left.
For best appearance, tie up your loom so that the floats pass beneath the warp as you are weaving.
Scarf dimensions planned are @10 in. wide and 36-43 in. long plus 1/2 in fringe using 236 warp ends.
Tools needed
A. Something to pick individual warp ends with. My best recommendation is a set of dental tools. You can get a relatively inexpensive set on ebay like this one. These tools are excellent to have on hand for many of your weaving needs. Tools vary between manufacturers and my favorite tools come from the set linked here.
B. Means to mark the starts and ends of pattern weaving. For me, the best means is two large metal paper clips joined together with about 5 in. of string. NOTE: if using paper clips, wrap the clips with scotch tape to prevent snagging of the warp as you are passing them thru. I found that I needed three sets.
C. Means to identify center threads of the warp an starting points for the star.
D. Shuttle to hold pattern yarn. I use a wooden embroidery floss bobbin that I go in a set at Gulf War. Whatever you use, keep the profile low as to not overstretch warp ends as you are weaving the pattern with soumak.
E. A printed copy of White Scarf Notes (see below)
F. The cartoon of the star. When printing this, it is imperative that you do not adjust to margins or fit to page as this will change the size of the printed star. I printed the star on multipurpose transparency film and then cut out the black area of the star.
G. Treadle and pattern advancement trackers. For this, I use
- Clover 336 Knitting Counter Kacha-Kacha to keep track of which treadle row I am working on
- A bead to track whether treadling order is going up or down
- Groups of beads to track pattern starts and ends; nine or ten beads will probably be enough.
The counter is velcroed to my castle and I hung the beads on a string across the castle.
Weaving the Pattern
As you are weaving the pattern, keep in mind that the star is woven mirrored meaning that anything you do on one side, you also do on the other.
| 100 ... 5 4 3 2 1 | | | 1 2 3 4 5 ... 100 |
| left | C | right |
If you have an even number of threads, the center is the open space in the absolute center with each warp end counted out from the center to the edge. If you have an odd number of warp ends, you will need to adjust the center one warp end to the left or right.
The ends of each of the star points should be finished with pairs of warp ends. Ending with only one warp end will leave the point looking blunted. You may need to make adjustments to advancements in last few rows to achieve this.
Soumak
Soumak is a weaving technique where the weft yarn goes around every two warp 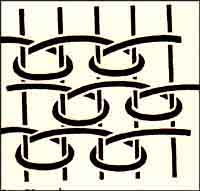 ends. As shown in the image to the left, each successive row should be offset from the previous row by one warp end. Failure to offset the rows will lead to unstable areas that can allow objects like tipped rapier ends to pass through.
When you are working with only one available warp end, take care to wrap it loosely. 
White Scarf Notes
The White Scarf Notes shown on the rights displays the advancements and counts used. (click on it to see larger image)
Advancements
This indicates how many warp ends you need to move your marker in the direction of the angle for each row. For instance, the side C - B starts at 1 on row 1. On row two, it is 1 so move the marker one warp end in direction of angle. On row three, it is 2; so you will move the marker 2 warp ends in the direction of the angle. As there are only three steps in this sequence, on row 4 you are back to step 1 which is 1, so you move the marker. Remember, whatever you do to one side, you need to duplicate on the other side.
Counts
This indicates the number of warp ends contained within a block. C - M contains 110 ends and A - C contains 55 ends
55 ... 1 | 1 ... 55
C A | A C
Where not specified, use the cartoon to determine best placement. Just be sure to mirror what you do.
Things to do or keep in mind while weaving the star:
- Take regular extended break
- If possible, swap out the bench with a padded chair
- Do not 'beat' while weaving the start. Use light presses with the batten in blank spaces and a more firm press after you have exited the shed. Over compressing the shots will alter the appeance of the star.
- Be sure to manage excess twisting created when passing the shuttle to create soumak stitches. Yarn too untwisted creates 'blips' in the star while over twisting leads to knots.
- Too many scarves on the loom will lead to loose warp threads. Limit to 6 or less.
So, to business...
First, dress the loom and weave the header to get everything in order.
Next mark the center two warp ends (end #1 left and end #1 right). To do this, I wrapped a string around the first shaft and the two warp ends. I made sure the loop was long enough so to not interfere with the shed and I weighted the bottom using a large paper clip to prevent it from riding up.
Do the same thing to mark the two starting points (C & M) wrapping warp ends 54 & 55.
Next, weave about two inches following the selected draft. Don't forget to leave a tail on the first row for hemstitching. Once you have woven the two inches is a good time to hemstitch the beginning.
If you have not already done so, wind yarn onto your pattern shuttle. How much you wind on is a balance between having enough to weave for a while while not being so thick it can damage your warp. I recommend wrapping the yarn tightly onto the shuttle as it is going to be somewhat abraded when passing through the warp. If too loose, the wrap can become difficult to work with.
While there are techniques for swapping shuttles inside the pattern, I am uncomfortable using them on a product that I expect to be abused such as this scarf. If there is not enough yarn on the shuttle to complete the current row, I prefer to do the swap outside the pattern - cutting off the remaining yarn on the shuttle and then reloading the shuttle.
Now, set your counter and trackers. You need to track what treadle row you are working on and whether treadling order is going up or down. Addtionally, for the first row you need three 'beads' for C-B and four for C-D. You will also soon need an additional five to track A-B
Then, on the first pattern row, use one set of paper clips connected by a string to mark the beginning and end of pattern areas. Pass one clip between warp end 56 & 55 (C-D) and the other between 54 & 53 (C-B). This marks step 1 for C-D (0) and C-B (1). Again, don't forget mirror actions on both sides.
Next, change from your weaving shuttle to your pattern shuttle short of the first pattern area exiting the shed at the start of the first pattern start. Beat lightly to set the yarn and then close the shed.
Before weaving the pattern, it is a good idea to drap a short piece of colored yarn over ends 54 & 55 and tucking it next to the fell. This will aid in lining up the cartoon when you need to check things. Important: remove the colored yarn once you have finished weaving the star.
Weave the first pattern stitches. To do this, pass the shuttle under ends 55 & 54 then back under ends 55 & 54. This completes the first soumak stitch. Open the shed and pass the shuttle through to the start of the next pattern start and beat lightly. Repeat the process passing the shuttle under 54 & 55 and then back under 54 & 55.
When weaving the soumak stitches, you need to find a balance between having the loop snug enough that it is firm without pulling the warp ends together. Some gathering is unavoidable but needs to be avoided as this will cause tension issues with the warp especially if you are weaving multiple scarves. Also, you need to avoid twisting or unplying the yarn. Two things you can do to accomplish this are
- Always keep the forward edge of the shuttle moving in the direction of the loop - like a plane doing a loop the loop.
- Periodically, let the shuttle dangle off the end of the shed to let out excess twist.
Pass the shuttle to exit the shed and do a final hard press to set the shot; do not beat. As you can see, you will be beating multiple times on many of the rows. Overbeating will distort things so it is a good idea to beat just enough to gently set the yarn next to the fell. After exiting the shed, use the final beat to adjust for an even beat.
It is a good idea to get into the habit of doing the following as soon as you exit the shed and beat.
- Advance your treadle tracker to next row
- Adjust tracker indicating whether you are going up or down
- Advance your pattern trackers
- Move pattern start and end markers as indicated by pattern trackers and White Scarf Notes
- Insert your pattern shuttle into the shed to the first pattern start
- Take a break as needed
This way, you won't forget to adjust things and, if you have to leave to leave the loom, you will always know where you are when you return.
Following the steps in the box above, for step 2, we leave the marker for C-D (0) alone and move the marker for C-B (2) two warp ends in the direction of the angle. Weaving the second row is similar to the first except you now have four warp ends in each pattern set. As soumak only uses two ends, you will weave a second soumak stitch in each pattern group. Remember that each pattern row needs to be offset from the previous row. As C-D did not move, you will need to create the offset by putting the first soumak stitch around 55 and the next around 54 & 53 and the last aroun 52.
When weaving the soumak stitch around a single warp end, you won't have a second end to help with tensioning. So, you need to purposely keep the loop a little loose; too tight, the loop will not be visible in the pattern.
You may be tempted to pick up end 55, pass the shuttle thru and back around it and then pick up ends 54 & 53 for the next stitch. A better way is to pick up 55, pass the shuttle thru and then pick up 55, 54 & 53 to pass the shuttle all three. Then pick up 54, 53 & 52 to complete the next stitch and finally 52 for the last stitch.
In general, using 1-6 as an example, pick up 1 & 2, past the shuttle thru then pick up 1, 2, 3 & 4, pass the shuttle thru, pick up 3, 4, 5 & 6, pass the shuttle and then finally 5 & 6 for the final loop.
Continue weaving the first few rows until point A of the cartoon is touching the fell. You will then add another colored thread and pattern markers across 1 & 1 (AL) as you did at the start of points C & M. You will also have another pattern to track (A-B) .
Onward and upward. Continue weaving. At a certain point, the three patterns will merge and you will only be tracking A-D. Continue weaving but periodically check things with the cartoon. When the bottom of the star point D-E lines up with the fell, move the tracker out 27 ends as indicated in the White Scarf Notes then start tracking E-F and weave until point F is on the fell which is when you will switch to tracking F-G.
Continue weaving this way until you weave the last soumak stitch in the star. At this point switch over to you weaving shuttle and weave the rest of the scarf.
Hemstitch this end and you're ready for finishing (unless you're nuts like me and warp your loom for 6 of these).
Finishing
If weaving multiple scarves, cut them apart before continuing.
If like me you are weaving with silk from Treenway, you'll note the yarn is more cream than white. To get around this, I bleach it.
To bleach the silk, follow the instructions here.
After bleaching it, put it in to the washing machine set for luke warm and gentle soap. I use Eucalan.
Next, put the scarves into the dryer in low heat along with a couple of white bath towels and dry until slightly damp. Don't allow them to fully dry.
When they are slightly damp, using a steam press or iron set to low end of silk temperature setting, press them until completely dry. Three passes should do it. If you are using an iron, it is important that you press, not iron, your silk. This process sets the threads in position.
Ironing and pressing are often used interchangeably, but are actually two separate techniques. Ironing is the back and forth sliding motion most of us are familiar with. Pressing is the placing of the iron on the fabric, holding it there, and then removing.